
The human form is generally considered the most challenging subject in art. In this tutorial series Ramon …
$199.00
Course Access
Unlimited Duration
Total Video Time
16 hours, 45 minutes
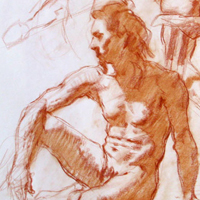
The human form is generally considered the most challenging subject in art. In this tutorial series Ramon will introduce fundamental methods designed to break down the human figure into its simplest forms. Time will be spent studying different angles to learn the construction and function of each part of the body. Each section will end with a demonstration on how to apply the lessons using old master drawings and paintings as reference.
Bio: Ramon Hurtado is a contemporary landscape and genre painter living in Los Angeles. His work aims to capture the always mysterious and sometimes mystical aspects of life in Los Angeles; exploring the customs of different groups of people and responding to the rich aesthetic experiences created by the desert sun.
Supply List and Reference Images
Ramon Hurtado
About Instructor
Ramon Hurtado is a contemporary landscape and genre painter living in Los Angeles. His work aims to capture the always mysterious and sometimes mystical aspects of life in Los Angeles; exploring the customs of different groups of people and responding to the rich aesthetic experiences created by the desert sun.
Course Curriculum
-
- Introduction To Figure Construction | Preview FREE 00:05:00
- Preview for Introduction To Figure Construction with Ramon Hurtado.
-
- Drawing Language 00:06:00
- The basic tools of drawing will be discussed in an introduction to the language of drawing. Technique and materials will be discussed before drawing exercises are demonstrated.
- Rhythm 00:04:00
- The elements that make rhythm work will be broken down into three components. This lecture will describe how to use c-curves, s-curves and straight lines in drawing the figure.
- Forms FREE 00:17:00
- The differences between flat shapes and three dimensional forms will be demonstrated with diagrams. Cross contour lines around forms will help show the volume in a drawing.
- Combining Forms 00:16:00
- The combining of forms and fitting them together will help develop convincing figures. Overlapping of forms will be an important tool to help add dimension to volumes.
- Gesture to Simple Forms 00:32:00
- The principles of design discussed earlier will be used to draw the figure using a study by master artist Alexandre Cabanel as a reference. Volume will be developed by overlapping forms to clarify the objects in space and capture the movement of the figure.
- Clear Sense of Direction 00:27:00
- Boxes will be used to help communicate a clear sense of direction in a figure drawing. A drawing by Gaetano Gandolfi will be used as a reference in to help understand the direction of the forms of the figure.
- Maintaining the Gesture 00:38:00
- A drawing by Ilya Repin will be used as a reference in a demonstration using the steps previously discussed. The gesture will be an important first step in establishing the rhythm and flow of the figure.
- Bony Landmarks 00:14:00
- Locating boney landmarks on the body will be an important tool to use when drawing the figure. The relationships of these landmarks wlll be demonstrated with diagrams of a figure from the front, back and side.
- Proportions 00:13:00
- The distance between landmarks will be demonstrated using the hand as a measuring tool.
- Front of the Torso 00:29:00
- The torso will be broken down into simple forms to get an understanding of how the torso moves through space. Clarification of the muscle groups will help build better figures more consistently.
- Building the Torso 00:21:00
- The torso will be drawn in a variation of poses to show how the muscles move when the arms are stretched out. Differences between women’s and men’s bodies will demonstrated.
- Back of the Torso 00:39:00
- Diagrams will be drawn of the back to show how the muscles wrap around the torso. The differences of the back muscles between men and women will be demonstrated.
- Side of the Torso 00:22:00
- Diagrams will be made of the side of the torso to show how the muscles transition from the front to the back. A diagram will be drawn to show how the muscles differ when the arm is stretched out.
- Front Torso Study 00:23:00
- A drawing by Francois-Xavier Fabre will be used to construct a diagram to help understand the forms the torso. The study will help studenys understand how to clarify the interaction of the forms of the torso.
- Study of the Back 00:16:00
- A drawing by Jacopo Pontormo will be used as a reference for a drawing study of the back. An overview of the muscles of the back will presented as the structure.
- Leg Structure 00:19:00
- The skeletal structure of the leg will be clarified with diagrams of the leg from a front and side view.
- Large Forms of the Leg 00:12:00
- The large overall forms of the leg will be broken down into simple muscle groups. Different angles of the leg will be drawn to demonstrate how the muscles function.
- Anatomical Groups of the Leg 00:20:00
- The muscles of the leg will be grouped by function to help students understand how the legs move. This section will focus on the front of the leg.
- Outside of the Leg 00:11:00
- The lecture will continue with the outside of the leg.
- Inside of the Leg 00:10:00
- The lecture will continue with diagrams of the inside of the leg.
- Back of the Leg 00:10:00
- The back of the leg will be the focus of this section.
- Front Leg Demo 00:18:00
- A painting by Francois-Xavier Fabre will be used as a reference for a drawing of the legs. The steps discussed earlier will be used to develop the muscle structure.
- Back Leg Demo 00:10:00
- A drawing by Francois-Xavier Fabre will be used to demonstrate the muscle structure of the back of the leg.
- The Arm 00:15:00
- The arm will be broken down with an overview of the skeletal structure. Viewing the arm from different angles will show how the hand rotates.
- Large Forms of the Arm 00:15:00
- The muscles will grouped simply to show the major forms of the arm. The different angles will help show how the muscles overlap and stretch.
- Anatomical Groups of the Arm 00:29:00
- Anatomical diagrams will show how the muscles of the arm function. This section will focus on the front portion of the arm.
- Back of the Arm 00:18:00
- Diagrams of the back of the arm will demonstrate the range of motion and function of the muscles.
- The Arm Stretching Up 00:00:00
- A diagram of the arm stretching up will help clarify the complexity of the arm muscles.
- The Arm Across the Figure 00:08:00
- A drawing by Alexandre Cabanel will be used as a reference for a drawing of the arm reaching across the body.
- Arm Holding a club 00:07:00
- A drawing by Alexei Yegorov will be used to demonstrate how the arm muscles reach out when holding an object.
- Figure Drawing Study 1 00:22:00
- A painting by Francois-Xavier Fabre will be used as a reference for a full figure demonstration. Time will be spent in this first stage focusing on the gesture and volume.
- Adding Form 00:15:00
- Adjustments to the drawing will be made before moving to the next stage. The overall form will be developed by refining the rhythm and volume
- Anatomical Forms of the Torso & Neck 00:17:00
- The muscles of the torso and the neck will be developed as the large forms are broken down into muscle groups.
- Anatomical Forms of the Arms 00:12:00
- The large forms of the arms will be developed to reveal the muscles groups.
- Anatomical Forms of the Legs 00:18:00
- The large muscle forms of the hips and legs will be developed.
- Hands & Refining the Drawing 00:16:00
- The structure of the hands will be developed. A black pencil will be used to emphasize the main forms of the figure.
- The Feet & Finishing the Drawing 00:14:00
- The structure of the feet will be developed as the muscles are added. Some of the major forms of the figure will be developed further.
- Figure Drawing Study 2 FREE 00:24:00
- A study of a painting by Jacques-Louis David will be used as a reference for a study of the figure seated on the floor. The same process will be followed in developing the structure of the figure.
- Clarify the Volumes 00:29:00
- After the volumes are refined, the anatomical masses will be added. This section will focus on the torso and arms
- Feet & Emphasizing Forms 00:16:00
- The muscles of the feet will be added. A dark pencil will be used to emphasize the major muscle groups.
